Revit walls - create complex wall assemblies

This will be a multi-post breaking down Revit walls function and how to best utilize this families features. We will start with the family editor, specifically for a basic wall. Each wall system family type includes different Type Properties parameters but the wall editor will follow the examples below.
Wall type properties
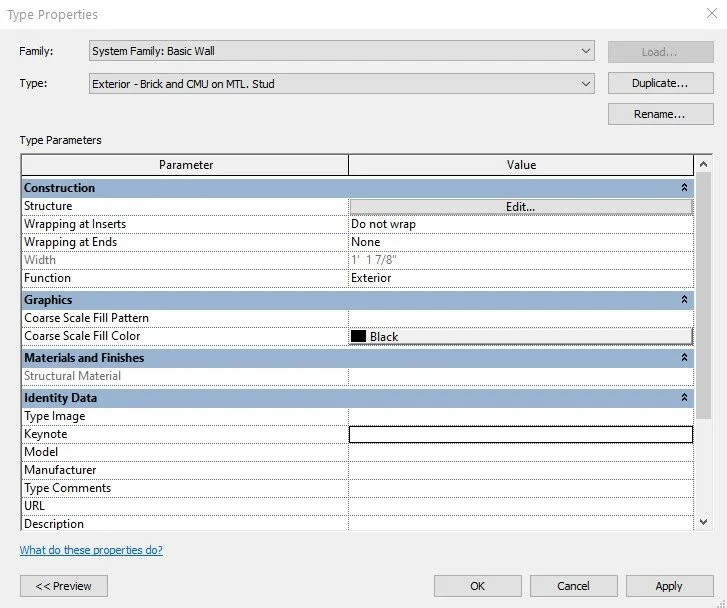
Inside the Type Properties window there are a couple different features that are not found in other families and are unique to assembly families (i.e. walls, roofs, floors, and ceilings). First is the “Coarse Scale Fill” graphics display parameters, which controls how an assembly family will look when a cutting view (plan or section) has display view set to “coarse.” This is particularly useful when there is a large floor plan and the need to differentiate wall types graphically (standard partitions vs rated assemblies).
Secondly, under the Construction category there are parameters for “wrapping at inserts” and “wrapping at ends.” These parameters are found here for quick edits but are also adjustable inside the structure editor. We will discuss this more later in the article.
Lastly there is the structure editor, which is unique to assembly families. This lets users create custom wall profiles that contain various levels of BIM data which can range from graphic representation, cost, material takeoffs, volumes, etc…
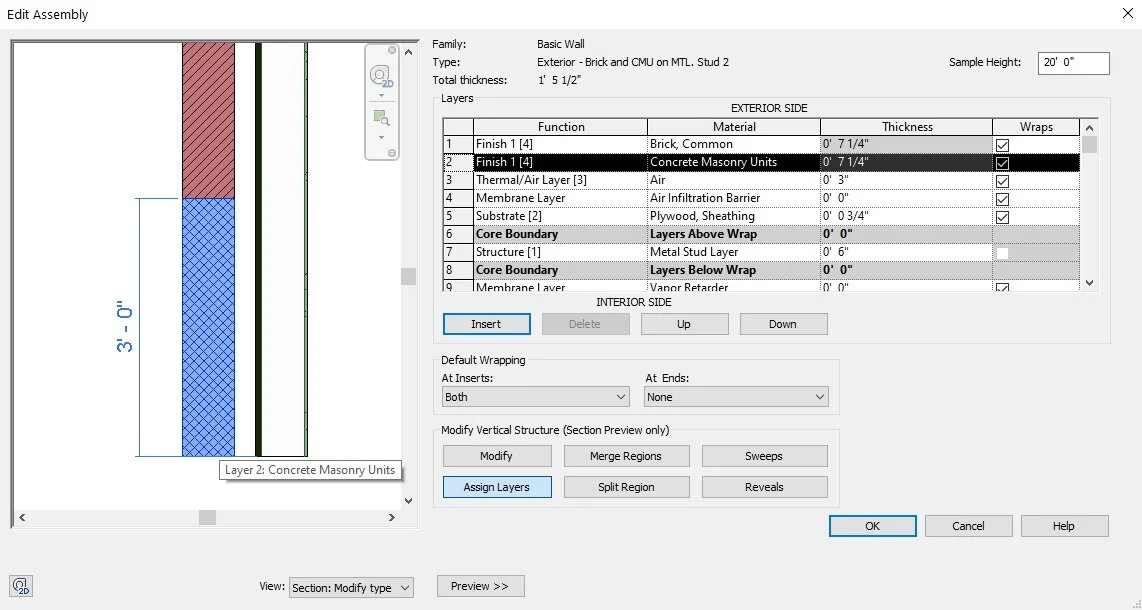
Wall structure assembly editor

Clicking on the edit button under the Structure parameter, the window will turn into the wall structure assembly editor. There are three sections for defining a custom wall profile: Layers, Default Wrapping, and Modify Vertical Structure.
Wall layers
This section is specifically dedicated to defining number of layers, function, material, thickness, and wrapping parameters.
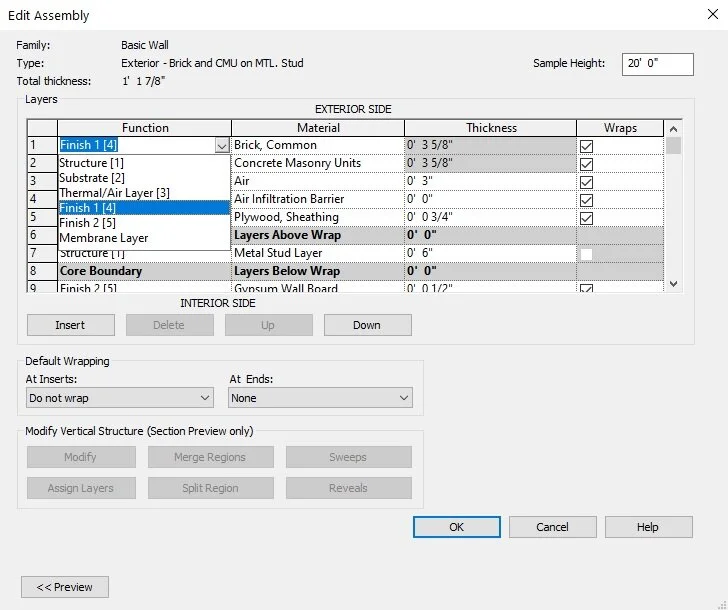
Function
Starting with the function column, each layer in an assembly should be assigned a function. This allows Revit to properly identify layers and ensure each layer intersects with each other at a joint. If layers are not identified or mislabeled Revit will have issues showing wall joints accurately. Additionally, each function is identified with a priority number in brackets. This allows Revit to troubleshoot which layers have overlap priority. If you want to learn a few more layer joint rules, go to Autodesk Knowledge Network.
Material
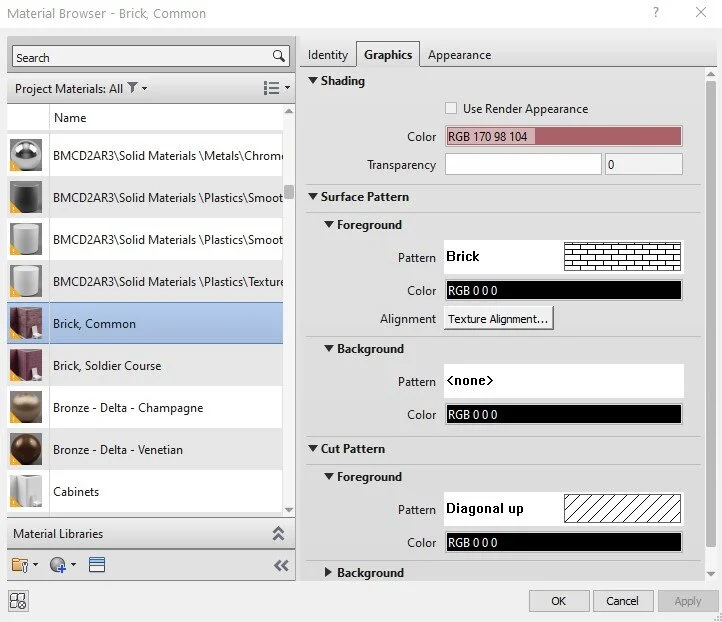
Layers can also associate material properties for richer graphics and BIM data for analysis. Materials are important for a couple of reasons, first and foremost, materials allow users assign hatching graphics and photo realistic materials for graphic display and renderings. Secondly, users can also associate additional information with a material such as: cost, manufacturer, keynotes, thermal, and physical properties. In order to calculate energy efficiency, cost, quantities counts, structural analysis, etc... these additional parameters are important.
Thickness
The thickness column is important simply to ensure accurate overall widths in plan, schedule calculations, and energy analysis.
Layer wrapping
The last column assigns the ability for a layer to wrap around edges assigned by the default wrapping section. Only layers outside of the core boundary can wrap at inserts and ends.
Default wall wrapping
Default wrapping section in the wall assembly editor controls how layers wrap at the ends of a wall or when openings (such as a window or door) is placed in a wall. If the layer has the box checked, the material has the ability to wrap at ends and inserts.
Wrapping at inserts
Wrapping at an insert refers to how a material interacts with a family that creates an opening in a wall. Specifying this allows for greater control over how a jamb detail looks at a smaller scale. This can help save time when drafting finish details. Additionally, quality window and door families have specific parameters for adjusting how far in the material wraps at either side of the walls. More detailed information can be found at the Autodesk Knowledge Network.
Wrapping at ends

This dialog controls which material, interior or exterior, wraps at the end of a wall. However, this does not automatically wrap embedded sweeps or reveals around the corner and will have to be adjusted manually.
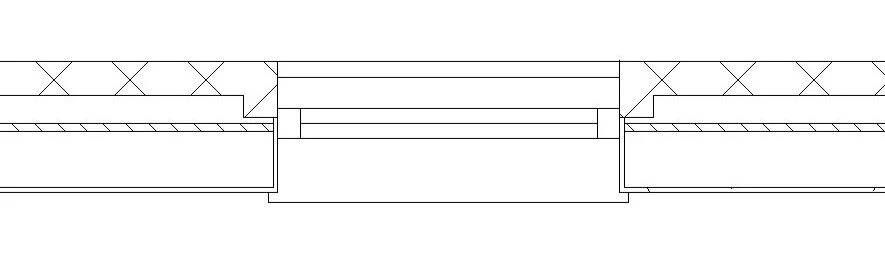
Modify vertical structure
The modify vertical structure section is the key to more advanced wall assemblies by editing layers, adding cornice sweeps, brick reveals, etc… This is particularly useful if projects are standardized with specific finishes or trim elements, such as franchise projects. In order to use these tools the wall preview window must be shown in section view.
Modify

Selecting the The modify tool lets users push and pull layers vertically and horizontally changing either the thickness, height, or direction of the dimension constraint.
This is performed by simply selecting the modify button and hovering over the boundary edge of a layer or split stacked layer.
Split region

Layers can split into separate sub areas both vertically and horizontally. Once performed, this allows layers to be unique profiles.
Once selected, simply hover over a layer boundary edge to see the split line option.
Merge regions

Merge regions lets users merge layers together. This is useful for showing layers as stacked, such as a brick wall top with a flagstone base.
Select the merge regions button and within the section view window, hover the mouse over a layer boundary. Hovering the mouse on either side of the boundary will control which direction the material will merge. Once merged the two layers will form into on piece.
Assign layers
Similar to the match type properties tool, once a layer is selected in the layers editor, select a layer inside the section view window to assign the same material to that layer.
This is useful when working to stack layer material in a wall assembly and want to show a separate material up to a sill and a separate material above.
Sweeps/reveals
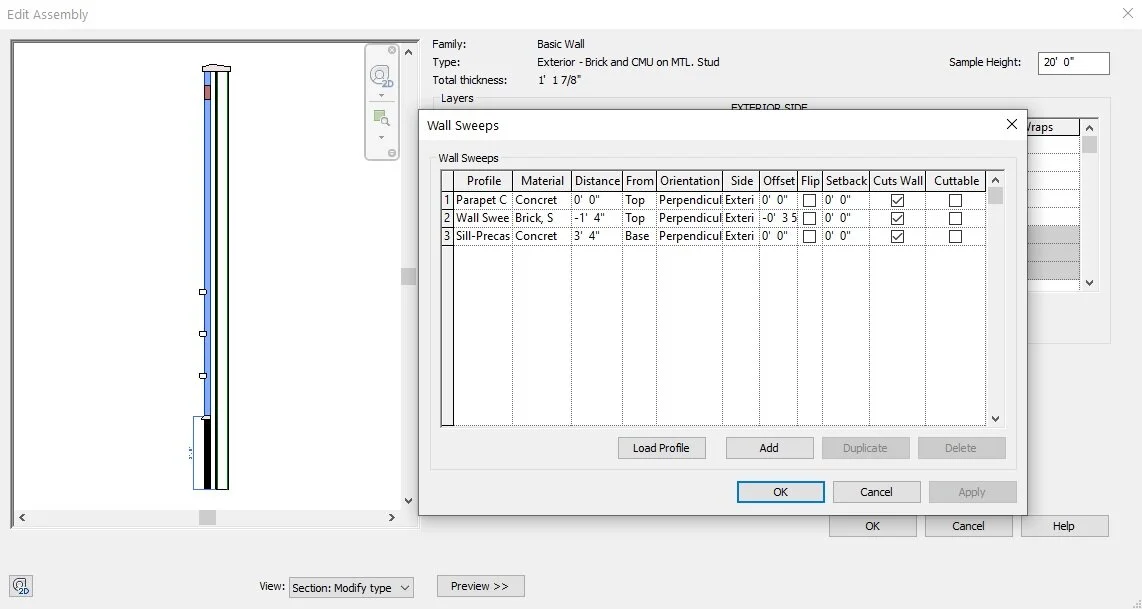
The sweeps tool allows custom profile families to be embedded in the wall family itself making it faster to generate wall profiles for standardized projects instead of creating a wall and adding a sweep/reveal separately.

The categories in the wall sweeps editor are self-explanatory, except for the last column. The column “cuttable” refers to how sweeps interact with a cutting wall element, i.e. window or door. When the box is checked it means the sweep will automatically cut to the profile of the cutting element opening not allowing adjustments. This can cause visual issues when a window includes trim. However, if the “cuttable” box is unchecked, Revit will automatically cut the sweep to the main opening but there will be adjustable handles on either side of the cut sweep to manually set the cutting point. Unfortunately, there is no way to automate the sweeps to be cut to the edge of the trim profile.
Reveals have a similar function to sweeps but take away material instead of adding to it.
Wall schedule changes
Two things to note when using embedded sweeps and reveals in wall profiles, sweeps and reveals subtract/add calculable volume from a wall and material layer parameters being cut, ensure this is considered when setting up schedules. Secondly, embedded sweeps and reveals will not show up in a wall sweep schedule since they are a part of the wall itself, only wall sweeps added after the wall is generated will be counted in these schedules. This is important if Revit needs to calculate the total linear feet of ceiling or base trim in a room.
The best way to get familiar with the wall editor is to take some time and mess around. Get a feel for each of the tools to really grasp how to make complex wall assemblies. Setting up custom wall profiles can be super helpful for franchised projects or commercial projects.