Revit Drafting Views Vs. Legend Views: Which is best?
Drafting Views
How to use drafting view

A typical callout, elevation, or section view shows modeled geometry which a user can modify or add more information to the drawing on top of the existing model that can sync changes with the updated model. Conversely, drafting views are not linked to model geometry which allows the user to generate more detailed drawings that will remain static when a model is updated. In essence, drafting views are separated blank views.
This is useful for three reasons: time, experience, and deliverables. Using drafting views increases the speed of drawing production by either using existing details from either in-house or manufacturer details, or the user does not have time to generate a fully detailed unique drawing modeled for a project. The next reason, experience, is a common example. Not every firm has the same level of experience/adoptions and simply sticking with what is familiar, a 2D drawing, can help moving things along instead of learning to adopt a more 3D BIM modeling approach. The final example, deliverables, is the main driver for drafting views. Not every project has the same level of commitment to a BIM forward lifecycle approach, and simply dropping in a quick sketch makes the most sense when deliverables end at issued construction drawings.
Create a Drafting View
To create a drafting view, go to:

View > Create > Drafting View

In the Drafting View dialog, set the name, scale, and click OK.
Inside the view, users can treat views link any other: Import/link a CAD drawing and even generate additional drafting view by adding section or callout tags. Drafting views only limit modeled geometry and legend components. Otherwise, all 2D work is allowable.
Drafting view can link with View Tags

Most people do not know that Revit lets users link drafting views to view tags placed in other views.
Simply click on the view tag, section, elevation, or callout, and before placing the tag in the view, click the Reference Other View checkbox, inside the dropdown menu click on the desired view. Revit even, by default, sets the tag to indicate the tag is referencing a view with “SIM.” This is not limited to only drafting views, but users can also reference similar view types.
Saving drafting view to an external project
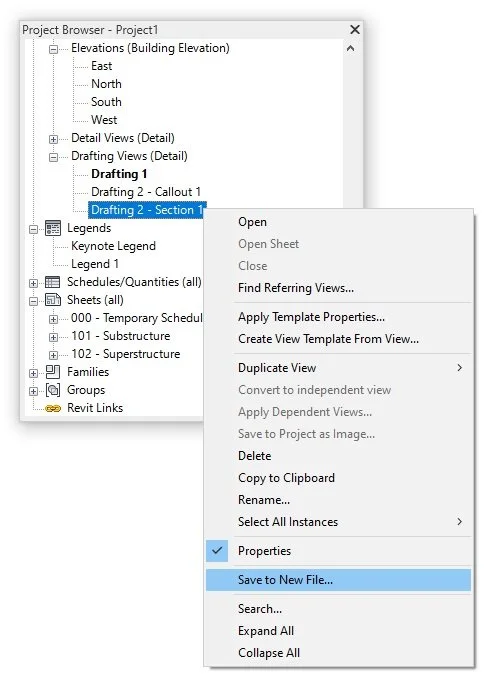
Users can save out any existing project drafting details out to their own separate Revit file. Inside the Project Browser right click on the drafting view and select Save to New File. Revit will then purge everything from the file so only the drafting view drawn details remain.
Using .RVT files for a drafting view library
A useful Revit tip is to create a Revit drafting view library. Instead of keeping a large collection of drafting details in every project, create a separate file that contains all generic or specific drafting details and use the Insert View from File tool to bring in needed details.

Insert > Load from Library > Insert from File > Insert Views from File

Once the drafting view library is selected, use the checkbox to identify which details to import.
Using a library helps to cut down on project file size and keeps a central location for all details, allowing BIM managers to only update details in one location for the entire office.
Legend Views
How to use Legend Views
Legend views are similar but different to a drafting view. While both view types can be utilized for drafting details, a legend view is typically used for displaying legend information in drawing sets, such as, notes, materials, phasing, symbols, annotations, and lines. Another differing feature is a single legend view is placeable across multiple sheets. This means users only need to update information on a single sheet instead of manually updating every sheet. A third difference is legend components are only usable inside Legend views. I will go into more detail later.
Create a Legend View
To create a legend view, go to:

View > Create > Legends > Legend

In the New Legend View dialog, set the name, scale, and click OK.
What are Legend Components?
As mentioned before, Legend components are only usable inside legend views. This is because their intended use is for representational diagram of model components such as assembly families and opening types (windows & doors).
The main benefit of legend components are, they represent modeled families while they do not increase the count in schedules. The main drawback are legend components can only use material tags and keynotes as of this writing. It would be great to add family specific door tags to allow for more complex tagging/annotations.
The main benefit to using legend views for are general notes on sheets. Instead of issuing messy drawings riddled with the same text note across multiple views. We can simple address the note change in one view and all the sheets will sync the change.
Keynote Legend
Keynote legend is effectively a schedule that is linked to the keynote tool. This allows users to link in standardized notes that are synced across all drawings. No more updating text on every single drawing. We go into more detail in our other article about why we use keynotes.
Import Legend Views between projects

Revit, natively, does not have a feature that easily lets users transfers Legend views from one project to the next. However, along with the wide range of additional free tools available for BIM managers, PyRevit has a tool to answer the years of community cries. Go to:

PyRevit > Drawing Set > Legends > Copy Legends to Other Documents
This tool works similarly to Revit’s native Transfer Project Standards, so open both files in the same window to transfer Legend views.
Do you have any interesting non conventional uses for either drafting or legend views? Share below!