3 Methods to Create Cost Schedules
Year over year construction costs have steadily increased but over the past couple of years costs have spiked above the norm. Construction costs expectedly increased by 14 percent in 2022 while the usual YOY increase has been 2-5 percent. Now more than ever architects, engineers, and contractors need to adapt better cost analysis techniques earlier on in the development lifecycle. While there are plenty of third-party software for cost estimation, Revit, being a BIM software, can provide multi-phase cost analysis at any point in the development lifecycle. While it cannot replace more focused solutions at the moment, it can provide automated and accurate cost estimations once set up in a Revit project template.
How does Revit incorporate cost calculations?
Cost parameters in quantity schedules
With most solutions in Revit, it starts with a parameter. Inside each object family Revit has a native parameter simply called cost. This is found in every furniture, wall, floor, ramp, railing, duct, pipe, etc., nearly every object family has a cost parameter associated. Revit has a cost parameter built into the materials library found under the Identity tab for a different set of cost analysis.
Cost parameters are editable inside the family Type Properties and utilized inside schedules. A standard Quantities schedule uses the Cost parameter to calculate average cost or cost per object or more complex calculations based on length, height, surface area, or volume. An example would be a schedule to calculate cost based on wall linear feet, cost based on floor area, or total cost with multiple door types.
Material cost parameters in material takeoff schedules
Separately only a “Material Takeoff” schedule can reference the “Material: Cost” parameter. Material Takeoffs allow users to more fine tune review bill of materials. For example, with properly assigned wall layers and thicknesses users can provide gypsum sheet counts for all interior walls for ordering or supply total estimated cost for an 8” CMU wall per unit.
Additional parameters
Additional parameters could be added to create more robust schedules that include labor rates, labor hours, sales tax rates, overhead profit percentages, etc.
Pros & cons
Investing in a cost analysis schedule system can provide a service value add when selling to clients. Ensuring clients receive smaller sticker shock so close to construction helps them come to terms with the design direction and cost value. While Revit currently does not compare equally to focused cost estimation platform, nor does every firm want to keep up with exact construction costs early in the design process, Revit is a good early cost analysis to drive efficient design choices. While referral relationships are built over years, consultants are not always available on your timeline. Being able to easily see what is driving cost on a project without needing to consult with a third party is a huge bonus. Being able to pull up rough costs can help push designs forward instead of waiting in limbo.
The main con against investing in a cost analysis template is: cost sourcing. Mainly how material and labor costs constantly change based on timeframe and location. Revit currently does not have a workflow to update costs quickly for all assets against a master database. However, once all schedules are set up, anyone can update costs on a per project or quarterly basis.
How to set up different Revit cost schedules
1. Family quantities cost schedules
As established earlier, Revit has native cost parameters associated with family objects. The example below uses a simple door schedule. We simply add the cost parameter to a standard schedule.

Now that each door in our plan has a cost, we can run a simple schedule to show us the cost for the whole project.
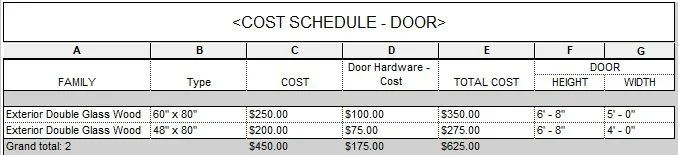
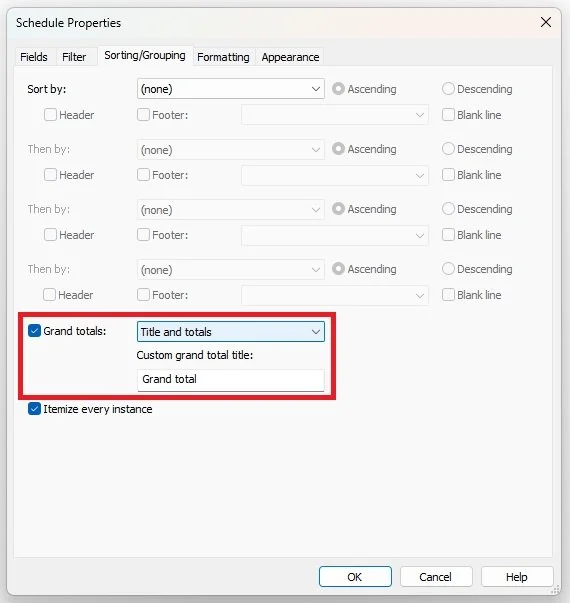
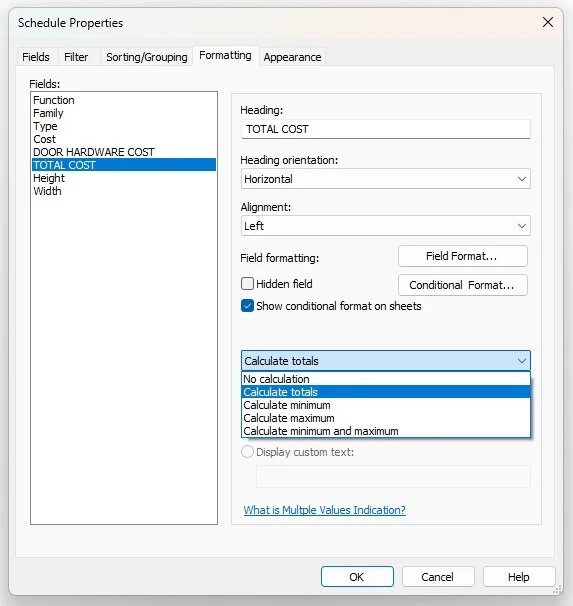
To show the total cost we need to adjust the settings under Sorting/Grouping and under Formatting to calculate totals.
We can take this schedule a step further by adding door hardware cost from a separate Key Schedule that contain all hardware combination options. This now show the total actual cost of each door. This practice can be used for separate families or can be applied to create a master list of all family quantity costs.
2. Family length, height, width, area, volume cost schedule
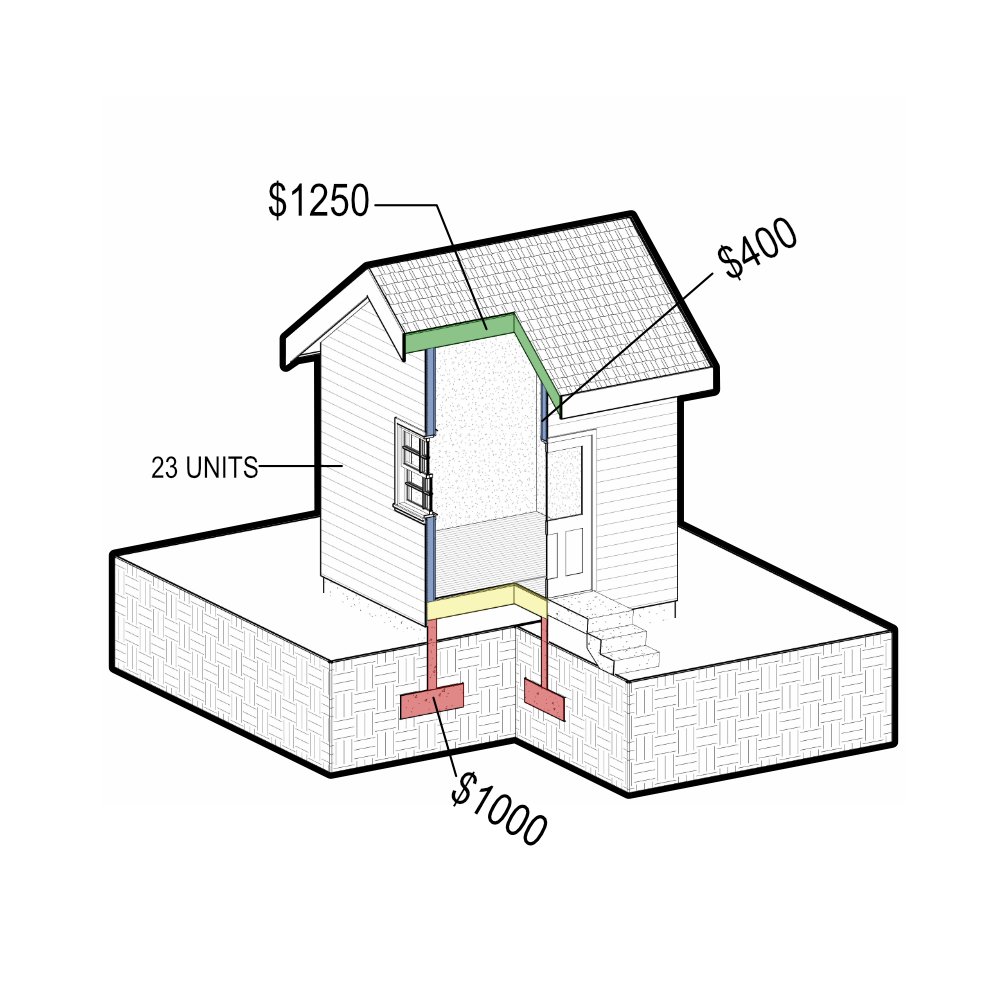
Did you know that quantity schedules allow users to reference dimension information for assembly families? This can be especially useful for calculating costs per foot, linear foot, square foot, or cubic foot for wall types, floors, roofs, and ceiling assemblies. In the example below we calculated the total cost of all walls by SF.

The Total Cost column is a calculated parameter by multiplying cost by total SF of each wall assembly based on wall type then dividing by 1 SF to show total cost. (We divide by 1 SF because Revit cannot have multiple units on one parameter.)

This schedule method can also use linear feet, height, or volume too.
3. Material Takeoff Schedules
The third method uses material takeoff schedules. While a quantity schedule uses parameters based on the family type, a material takeoff schedule derives parameters based on material type assigned to families and their surface area. This significantly helps when developing quantities based on specific materials used in assembly families, trim, casework, etc.
In the example below we calculate the total gypsum board area for all walls in the project, provide sheet counts estimations, and total purchase cost.

We calculate the number of sheets by creating a calculated parameter by multiplying the Material: Area by a typical sheet size area. This formula can be modified to add an overbuy percentage for materials.

This is finalized with a calculated parameter multiplying the Material: Cost by number of sheets.

Keep in mind, the Material: Area is a different calculation than Area parameter. For a wall with one layer of gypsum board at each side, the Area parameter only calculates the surface area of one side while the Material: Area parameter calculates surface area of each layer of gypsum board in an assembly. The same applies to volume parameters and why material takeoff schedules should be used to calculate material quantities.