10 tools every Revit beginner should know
Being new to Revit is tough. Revit has such a rich depth of features, even if you are only working with Revit LT and it can take years for you to truly master everything. To help speed up the learning process, I provided my top ten tools I use most often and think every beginner should know.
1 - Thin Line
This tool allows you to quickly switch between the current views, with line weights applied, to a view where all lines are set at the thinnest scale size. This allows you to quickly check if objects are joined, aligned, or clarify why there are some funky graphics showing up.
View > Graphics > Thin Lines

Shortcut:
Thin Line: TL
2 - Temporary hide/isolate
Out of all the view tools I find this to be the most useful. I wrote an earlier post about the different view tools in Revit. This tool lets you, without affecting the view permanently, temporarily hide, or isolate in view, selected elements or categories. I particularly find this useful when I need to see how the view looks temporarily or modify an element without other objects hogging my view.
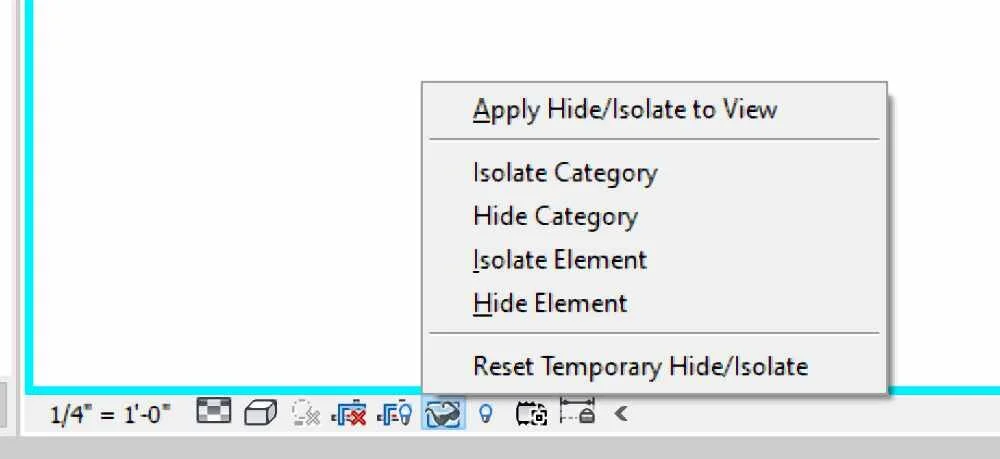
Shortcut:
Temporary Hide category: HC
Temporary Hide Element: HH
Temporary Isolate Element: HI
Temporary Isolate Category: IC
Reset Temporary Hide/Isolate: HR
3 - Pin
I wrote a whole blog post discussing what objects should and should not be pinned down in a project. Pinning should be an integral part of your project management structure and how you manage elements in a project. Simply enough, once an object is pinned you are unable to move the object until it is unpinned. Remember to be careful not to over pin, this leads to issues down the line when you need to make simple changes.
Modify > Modify > Pin

Shortcut:
Pin: PN
Unpin: UP
4 - Detail lines/model lines
Inside a project there are two types of drawable lines: detail and model lines. Choosing between the two is important. A detail line type only shows up in the view that it was drawn while a model line will be seen in 3D space. You should make your choice based on what you are trying to achieve. If you need a small drawing to show up in multiple plans and elevations you should use a model line but if you are drawing a section detail or other one off details you should stick with a detail line.
Annotate > Detail > Detail Line

Architecture > Model > Model Line

Shortcut:
Detail Line: DL
Model Line: LI
5 - Reference other view
Did you know when you generate a section, callout, or elevation tag you can reference an existing drawing instead? Say the contractor needs you to show a stair tread detail, you could draft up a new detail based on the model, or you could reference a detail drawing your firm has previously produced in the past which fits the condition. To do this, you select the callout/section/elevation and before you place it on the drawings.
Once you click the checkbox you can select a drafting view or other callout/elevation/section views as an elevation reference. This can easily turn an hour long task into a five minute workaround.
Modify > Reference > Reference in View.

6 - Linework
Have you ever had a section detail set at the proper scale but the line weights are off compared to the other drawings? If you use the linework tool you can select a line and change it to the line weight/type you need for the drawing.
Modify > View > Linework

Shortcut:
Linework: LW
7 - Split face
Did you know you can apply multiple materials to the same surface? If you use the split face tool you can easily have stucco material at the top wall half and flagstone shown as the bottom half material. For a few reasons it would be more beneficial in the long term to simply model the wall in 3D, but if you are in a time crunch using the split face on a wall or floor surface to add tile will do the trick.
Modify > Geometry > Split Face

Shortcut:
Split Face: SF
8 - Purge unused
The biggest culprit in slow models is over bloating the model with unused large families. It is easy to download a family online and not check the file size. It may be the only family online that fits what you need to show a client but this can be a slippery slope. The easiest and quickest way to speed up the file is to purge all unused families in the model.
When the dialog box pops up, every family that is currently not in use will show up. Click select all and hit OK and Revit will remove all families not currently placed in a project. This should be run periodically especially if you are a known Revit hoarder.
Manage > Settings > Purge Unused

9 - Room separator line
Say you place a room inside a kitchen/dining area but you need to calculate the area separately, you can do this by placing a room separator line between the areas to allow separate room tags and area calculations. Easy peasy.
Architecture > Room & Area> Room Separator

10 - Group items
Sometimes it can be a hassle to reorient a furniture set. Selecting and moving every object can be a huge waste of time. Instead, you can group multiple items to make it easier to move objects around as needed. Groups also make it easy to modify multiple instances. If you make changes to one group instance you make changes to them all. As a reminder to be careful about the number of different group types, this can also increase the file size if not managed properly.
Modify > Create > Create Group

Shortcut:
Create Group: GP